Last updated: July 2026
🚨 No Bands? Start Here
Quick Decision Guide
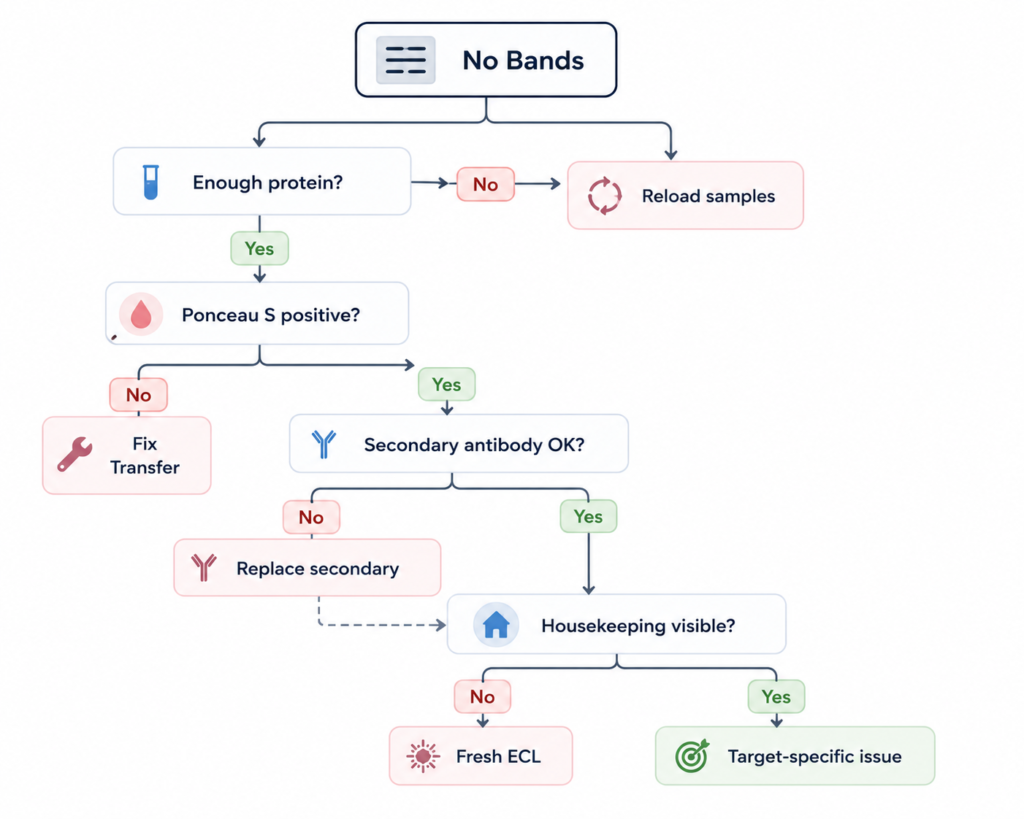
| ✓ (please check) | Check | Action if No |
|---|---|---|
| □ | Enough protein loaded? | Reload samples |
| □ | Ponceau S positive? | Optimize transfer |
| □ | Correct secondary antibody? | Replace secondary antibody |
| □ | Housekeeping protein detected? | Try fresh ECL |
| □ | Still no signal? | Repeat with fresh samples |
You develop the membrane, wait for the image to appear……and nothing shows up.
A completely blank Western blot is one of the most frustrating outcomes in molecular biology. After hours—or even days—of sample preparation, electrophoresis, transfer, and antibody incubation, seeing no bands at all can make it difficult to know where to start.
The good news is that a blank blot rarely means your target protein simply isn’t expressed. In most cases, the experiment failed somewhere along the workflow.
The challenge isn’t guessing what went wrong.
It’s identifying where the signal was lost.
Many researchers immediately increase the antibody concentration or order a new antibody. While antibodies can certainly be responsible, they are only one part of the experiment. If the protein never reached the membrane, changing antibodies won’t solve the problem.
Experienced researchers troubleshoot differently.
Instead of asking “Which reagent failed?”, they ask:
“What is the earliest step that could explain the missing signal?”
That simple shift in thinking makes troubleshooting faster, more systematic, and far less frustrating.
In this guide, we’ll follow the same workflow used in many research laboratories:
Rather than changing everything at once, we’ll identify one potential failure point at a time until the source of the problem becomes clear.
Why Are There No Bands on a Western Blot?
“No bands” doesn’t always mean no protein
When a Western blot fails, there are only two broad possibilities:
| Possible explanation | What it usually means |
|---|---|
| Technical failure | Something went wrong during sample preparation, electrophoresis, transfer, antibody incubation, or detection. |
| Biological absence | The target protein is genuinely absent or expressed below the assay’s detection limit. |
For most experiments, technical failure is the more likely explanation.
For example, protein degradation during sample preparation, incomplete transfer, an incompatible secondary antibody, or inactive detection reagents can all produce a completely blank membrane—even when the target protein is present.
Only after these technical possibilities have been ruled out should you consider biological explanations, such as low expression or tissue-specific absence of the target protein.
A useful way to think about Western blot troubleshooting is to treat it as a chain of dependent steps.
Sample
   ↓
Gel
   ↓
Transfer
   ↓
Antibodies
   ↓
Detection
   ↓
Imaging
Each step depends on the one before it.
If protein was never loaded, optimizing transfer won’t help.
If transfer failed, changing antibodies won’t recover the signal.
And if the detection system isn’t working, longer exposure times won’t magically reveal missing bands.
Don’t troubleshoot randomly. Troubleshoot the workflow.
Step 1 — Start with the Sample
Before thinking about antibodies or detection reagents, ask the simplest question first:
Did enough intact protein actually enter the gel?
If the answer is no, every downstream optimization is unlikely to help.
Most “no bands” problems begin long before the membrane reaches the imaging system.
Was Enough Protein Loaded?
Loading too little protein can leave your target below the detection limit, especially if it is expressed at low levels.
Rather than estimating by eye, measure protein concentration with a quantitative assay such as BCA or Bradford before preparing samples.
There is no universal loading amount. The optimal amount depends on your sample type, target abundance, and antibody sensitivity.
Could the Protein Have Degraded?
Even if you loaded enough protein, degradation can dramatically reduce the amount of detectable target protein.
Common causes include:
- Repeated freeze-thaw cycles
- Delayed sample processing
- Inadequate protease inhibition
What to do
- Keep samples on ice during preparation.
- Add protease inhibitors to the lysis buffer.
- Use fresh lysates whenever possible.
💡 Lab Tip
If your samples have been thawed multiple times, preparing a fresh lysate is often faster than troubleshooting the blot.
Rule Out Simple Loading Mistakes
It sounds obvious, but loading errors happen surprisingly often—even in experienced laboratories.
Check for simple mistakes such as:
- Loading the wrong well
- Pipetting outside the well
- Loading the wrong sample
- Loading an incorrect volume
These problems are easy to overlook and impossible to fix after electrophoresis.
Take a few extra seconds during loading—it can save an entire day of troubleshooting later.
Step 2 — Make Sure the Proteins Reached the Membrane
Once proteins leave the gel, they have only one destination: the membrane.
If transfer fails, antibodies have nothing to detect.
This is why experienced researchers rarely change antibody conditions before checking whether proteins actually reached the membrane.
Don’t Assume the Transfer Worked
A successful gel does not guarantee a successful transfer. Instead of adjusting multiple transfer parameters, first ask a simpler question:
Did the proteins actually reach the membrane?
A quick Ponceau S stain answers this in just a few minutes.
If transfer repeatedly fails, optimize the transfer conditions for your protein. Large proteins often require longer transfer times, while very small proteins may transfer through the membrane if conditions are too aggressive.
💡 Lab Tip
A two-minute Ponceau S stain can save an entire afternoon of unnecessary antibody optimization.
Did You Assemble the Transfer Correctly?
Completely blank blots sometimes come down to surprisingly simple mistakes.
Common examples include:
- Membrane placed on the wrong side of the gel
- Air bubbles trapped between the gel and membrane
- PVDF membrane not activated with methanol before transfer
Fortunately, these problems are easy to prevent once you know to look for them.
Troubleshooting Transfer
| What you see | Most likely cause | Try this first |
|---|---|---|
| No protein after Ponceau S staining | Transfer failed | Repeat the transfer after checking membrane orientation and transfer settings |
| Patchy protein staining | Air bubbles or uneven contact | Reassemble the transfer sandwich and remove trapped bubbles |
| Very faint protein staining | Inefficient transfer | Increase transfer time or optimize transfer conditions for your protein size |
Remember that transfer conditions are protein-dependent.
Large proteins often require longer transfer times, while very small proteins may transfer through the membrane if conditions are too aggressive.
If transfer repeatedly fails for the same target, optimize the transfer protocol for that protein instead of relying on a standard laboratory protocol.
Before Moving to the Antibodies…
At this point, you should be able to answer two questions confidently:
✓ Was enough protein loaded?
✓ Did the proteins successfully transfer onto the membrane?
If the answer to either question is no, fix that problem first.
Only after both steps have been ruled out is it worth investigating the antibodies.
Step 3 — Check the Antibodies
If protein loading and transfer look normal, the next step is to examine the antibodies.
Many researchers immediately increase the primary antibody concentration when they see no bands. In reality, this is rarely the fastest way to find the problem.
Instead, work through the following questions in order.
Is the Secondary Antibody Correct?
Before changing anything else, make sure your secondary antibody matches your primary antibody.
For example:
| Primary antibody | Correct secondary antibody |
|---|---|
| Mouse | Anti-mouse IgG |
| Rabbit | Anti-rabbit IgG |
| Goat | Anti-goat IgG |
Also check that the secondary antibody matches your detection method.
For example, an HRP-conjugated secondary antibody will not produce signal if you are imaging with a fluorescence protocol.
This simple compatibility check solves more problems than many researchers expect.
💡 Lab Tip
Before ordering a new primary antibody, double-check the species of your secondary antibody. A species mismatch can produce a completely blank blot even when everything else worked perfectly.
Does a Housekeeping Protein Produce a Band?
One of the quickest ways to narrow down the problem is to probe for a housekeeping protein such as GAPDH, β-actin, or α-tubulin.
The interpretation is straightforward.
| Housekeeping result | What it suggests |
| Visible band | Protein loading, transfer, and detection are probably working. Focus on the target protein or primary antibody. |
| No band | The problem is more likely to involve transfer, detection, or antibody compatibility than target expression. |
Housekeeping proteins are not a perfect control for every experiment, but they are often useful for distinguishing a target-specific problem from a workflow failure.
Step 4 — Check the Detection System
If protein loading, transfer, and antibody compatibility all look correct, the remaining possibility is the detection step.
Fortunately, this is also one of the quickest parts to troubleshoot.
Try Fresh ECL First
Before changing antibodies or repeating the experiment, prepare a fresh batch of ECL.
Chemiluminescent substrates gradually lose activity during storage, and fresh ECL can often restore signal within minutes.
💡 Lab Tip
If GAPDH or β-actin also fails to appear after developing with fresh ECL, the problem is unlikely to be target expression alone.
Increase Exposure Only If Needed
If a housekeeping protein is visible but your target band is weak or absent, try increasing the exposure time.
Longer exposures can reveal weak signals, but they also increase background.
If background becomes excessive, the problem is no longer “no bands”—it’s a high-background blot, which requires a different troubleshooting approach.
Check the Imaging Mode
Finally, make sure the imaging system matches your detection method.
For example:
- HRP-conjugated antibodies require chemiluminescent imaging.
- Fluorescent antibodies require the correct fluorescence channel.
Selecting the wrong imaging mode can produce a blank image even when the blot itself is successful.
Before Repeating the Experiment
Before starting over, ask yourself one last question:
✓ Protein loaded?
✓ Transfer confirmed?
✓ Secondary antibody correct?
✓ Fresh ECL used?
✓ Correct imaging mode?
If all five answers are yes and the membrane is still blank, repeating the experiment with fresh samples is usually more productive than continuing to optimize the existing blot.
A Practical Troubleshooting Workflow
When troubleshooting a blank Western blot, resist the urge to change several variables at once.
Instead, work through the experiment in the same order it was performed.
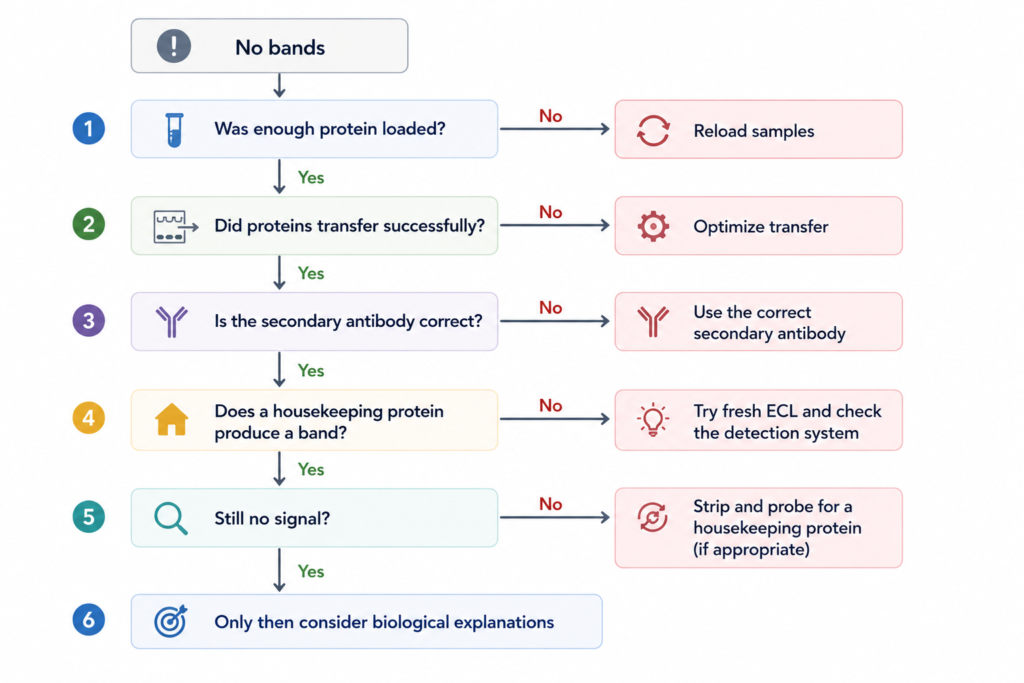
This workflow mirrors how many researchers troubleshoot Western blots at the bench.
Instead of asking “What should I try next?”, ask:
“What is the earliest step that has not yet been ruled out?”
That single question often saves hours of unnecessary optimization.
Common Troubleshooting Mistakes
Even experienced researchers can lose time by troubleshooting in the wrong order.
Here are some of the most common mistakes.
Changing the Primary Antibody First
If proteins never reached the membrane, a new antibody won’t help.
Forgetting to Check the Secondary Antibody
A species mismatch between the primary and secondary antibody is one of the easiest mistakes to make—and one of the easiest to fix.
Before repeating the experiment, confirm that your secondary antibody matches both:
- the host species of the primary antibody
- the intended detection method (HRP or fluorescence)
Skipping Ponceau S Staining
Many researchers proceed directly to antibody incubation without confirming transfer.
A quick Ponceau S stain takes only a few minutes and immediately tells you whether proteins reached the membrane.
Never assume the transfer worked.
Repeating the Entire Experiment Too Soon
Sometimes the membrane itself can still answer important questions.
If transfer was successful, probing for a housekeeping protein or developing the membrane with fresh ECL may identify the problem without repeating the entire workflow.
Repeating the experiment should be the last step—not the first.
Best Practices to Prevent Blank Western Blots
While no protocol guarantees success every time, a few quality-control habits dramatically reduce the chance of ending up with a blank membrane.
Before starting your next experiment:
- Measure protein concentration before loading.
- Prepare fresh lysates whenever possible.
- Add protease inhibitors during protein extraction.
- Check every transfer with Ponceau S.
- Confirm secondary antibody compatibility before incubation.
- Prepare fresh ECL immediately before detection.
- Include a positive or housekeeping control whenever appropriate.
- Change one variable at a time during troubleshooting.
Small quality-control steps are often the difference between a successful experiment and an afternoon spent repeating one.
Frequently Asked Questions
My protein ladder transferred, but my target protein didn’t. Why?
Prestained molecular weight markers do not always transfer exactly like endogenous proteins.
Always confirm protein transfer using a total protein stain such as Ponceau S rather than relying on the ladder alone.
How do I know whether my antibody is the problem?
Check a housekeeping protein first.
If GAPDH, β-actin, or another positive control also fails to produce a band, the problem is more likely to involve transfer or detection than the target-specific antibody.
Can expired ECL cause a completely blank blot?
Yes.
Loss of substrate activity can eliminate chemiluminescent signal even when antibody binding is successful. Preparing fresh ECL is one of the quickest troubleshooting steps.
Should I repeat the transfer or the entire experiment?
That depends on where the workflow failed.
If transfer failed but the gel is still usable, repeating the transfer may be sufficient.
If the problem occurred during sample preparation or electrophoresis, repeating the complete experiment is generally more appropriate.
Final Thought
If a blank Western blot is frustrating, but it is rarely random.
Most failed experiments can be traced back to a single step in the workflow.
Rather than changing multiple conditions at once, start with protein loading, then work forward through transfer, antibodies, and detection.
Finding the first failed step is almost always faster than trying every possible fix.
Continue Learning
The fastest way to fix a blank Western blot isn’t trying more solutions—it’s finding the first step that failed.
If your membrane has no bands at all, the workflow in this guide should help you identify where the experiment failed. However, not every failed Western blot is completely blank.
If your bands are visible but obscured by excessive background, the troubleshooting strategy is different.
Continue with:
- Western Blot High Background? Causes and How to Reduce Background Noise
- Weak Western Blot Bands: Causes and Proven Fixes
- How to Read Western Blot Results Correctly
- Western Blot Controls Explained
- PVDF vs. Nitrocellulose: Which Membrane Should You Choose?